Polishing woodturning projects. Which polish is best?
Every woodturner has a favourite polish but when you are starting out, the range of products on the market is quite bewildering - so where do you start?
- Removing rough grain, filling holes and cracks
- Sanding - all about abrasives
- Which is the best polish?
- Polishing with wax
- Cellulose sealers, polishes, melamine
- Shellac based sealers and polishes. Friction polish
- Finishing oils. Danish oil. Food safe oil.
- Water based finishes. Acrylics
- Synthetics. Waterproof finish
Good preparation is vital
Rough or torn grain patchesYour turned object must be turned and sanded on the lathe to a smooth finish. Tool marks must be removed or the polish will show them up. Bruised or torn grain caused by incorrect tool technique will be particularly visible and cannot be hidden by sealer or polish.
If you have trouble with lifted grain, try holding the tool at different angles to obtain a shear cut to improve the finish. Try light cuts with a shear scraper held at around 45°. If your lathe will run in reverse try sanding the other way to lift the loose fibres and cut them away.
Repairing cracks
Large holes and cracks can be filled using stopper. Stoppers available are clay base like "Brummer" or Rustins, Cellulose, Wax, Shellac + rosin, Polyester or Epoxy Resin, or just a home made mixture of sawdust and glue. Try to guess what colour the wood will eventually darken or fade to and colour the stopping accordingly. You can colour stopping using Chestnut Spirit Stain. Filler looks unnatural if it is lighter in colour than the surrounding wood.
Fine cracks can often be quickly repaired with thin superglue which will run in by capillary action. Wider cracks can be filled with sawdust from the same wood sealed in with superglue.
If the wood is not quite dry then cracks will want to open up or close up later on, so filling the cracks with a rigid material can make things worse. Try keeping the piece in a plastic bag for 24 hours to see if the cracks close up.
You can test if a piece is dry enough by putting it in a bag with a hygrometer. Leave the bag for a few hours in the house. If the wood is still losing moisture to the environment the hygrometer will show an increase in humidity in the bag.
If you are not sure if your wood blank is seasoned properly it should be rough turned first to almost the final dimensions and kept (protected from splitting by wrapping in newspaper) in a warm dry room until the wood has settled down a bit.
Grainfilling
Grain filler is sealer thickened with chalk or similar fine powder. The idea is to fill the pores of coarse grained wood such as oak. This is optional and can be dispensed with if the grain is fine or if you prefer the natural texture of the wood.
Sealer
Coarse grain or absorbent wood will benefit from an initial coat of sealer. This will provide a quick build-up of "basecoat" which fills the grain to some extent and prevents the final coats of polish (the "topcoat") from sinking in. The sealer, when dry, will need light sanding or burnishing (known in the trade as "de-nibbing") to produce a super smooth surface ideal for the application of the polish. "Sanding sealer" is sealer specially made to "de-nib" easily.
The sealer should be chemically compatible with the polish which goes on top of it. For example you should choose cellulose sanding sealer to go under a melamine topcoat or acrylic sanding sealer to apply under acrylic gloss. Manufacturers produce "systems" of basecoat and topcoat which are guaranteed to be compatible. Incompatible layers of polish may not bond properly and will look slightly "milky". I have seen an acrylic finish flake off a coat of cellulose after a year or three, especially in the presence of damp.
Very fine grain wood may not need any sealer and polish can be applied to the bare wood.
About abrasives
Sandpaper is, of course, a misnomer because most modern abrasive products contain neither paper nor sand. Most woodturners use aluminium oxide abrasive grit bonded to a cloth or mesh backing. Cloth backing is better than paper backing as it is longer lasting and more flexible. Look for the word "flex" on the back - an example is Hermes 346 J-Flex. This material has specially enhanced flexibility so that it can conform to intricate shapes on the lathe. Cloth abrasives are virtually waterproof so can be washed to de-clog the grit. They can be stored without degrade in a damp shed. Cloth is durable and does not wear through to your fingers. It is supplied in rolls of various widths and lengths and can be torn very easily into handy size strips. "Resin bonded" abrasive grit is very firmly attached and supported by a layer of resin usually red in colour. This makes the product very long lasting. Stearated grit has a lubricating non-stick top coating. This makes it cooler cutting and resistant to clogging. Cooler cutting reduces the danger of heat cracks. Excessive heat from over enthusiastic sanding can dry the surface of the wood causing fine cracks to appear. Cracks are often seen on the "end grain" areas of bowls which have been sanded too heavily. Grits used range from 60 down to as fine as 600 grit. The higher the number the finer the grit. 60 grit is very coarse and 600 grit is very fine. For most jobs you can start with 150 grit and work up through 180, 240 to 400. For fine grained wood such as yew go to 600 and polish with 1500 grit webrax before you apply the finish.WEBRAX is an abrasive mat of nylon filament similar to domestic pan scourers. This stuff is available in a range of grit sizes and is made with either silicon carbide (SiC) or Aluminium Oxide abrasive. It is very flexible and soft. The 1500 grit SiC Webrax is particularly useful for finishing on fine grain woods. It is very useful for rubbing down sealers and lacquers, "de-nibbing" as they say in the cabinet finishing trade. It can also be used for applying wax or for wet sanding. It is handy as a backing pad to keep your fingers from burning when using conventional abrasive paper.
MICROMESHThis excellent and increasingly popular abrasive has grit bonded to a fine mesh which lets the dust fall through. It sticks to hook and loop backing pads and can be used with a vacuum system to suck dust away.
WIRE WOOL is often used for de-nibbing or applying wax. Ask for the finest grade (0000). When using wire wool take care not to get it wrapped around the work. Use only small pieces at a time. Keep it away from naked flame or grinding sparks. Do not use it on oak as little particles of iron left in the grain will stain the wood.
Safety tips when sanding
(1) When sanding always make sure your fingers are trailing rather than pushing against the direction of rotation or you risk injuring a finger. Take great care when sanding inside bowls and containers. When sanding spindle work you should hold the abrasive under the workpiece because the underside is the part which is rotating away from you. Alternatively you might prefer walking around to the rear of the lathe and sanding the top of the work which is then moving away from you.(2) Keep clear of sharp rotating edges, particularly bowl rims which can cut through your skin in a instant and give you a wound which takes weeks to heal.
(3) ALWAYS remove the tool rest before sanding or move it well away. (4) Wear a mask or powered respirator even if you are using a dust extractor. Most dust extractors should be called chip extractors because they just do not remove the fine (invisible) dust which is the most harmful to your lungs. If you have an extractor, position the nozzle so that it collects the most dust. Use a wide nozzle for spindle work.
(5) If you are using abrasive in strip form never give it a chance to get wrapped around the work. Never wrap abrasive strip (or anything else) around your fingers in such a way that the free end may get caught round the workpiece.
Using Abrasives
Once you have the best finish you can achieve with your turning tools you will need to get rid of tool marks with coarse abrasive. 120 or 150 grit should be coarse enough to start with unless you have badly torn grain. For sanding large areas or inside bowls tear up the abrasive into convenient size squares and fold into three. For sanding fine details you can tear narrow strips. Tearing strips is easy with cloth-backed abrasive. Use the strips in tension or wrap strips around a former to get into hollows in spindle turning. Formers can be scraps of wood, dowelling, pencils, pieces of leather or carpet or whatever comes to hand. Sanding inside bowls produces lots of heat which can burn your fingers. You can try using a wad of leather, wire wool, webrax or layers of old abrasive cloth between your fingers and the abrasive to save discomfort. You can glue pieces of abrasive cloth back to back, using double sided tape or leather adhesive, to reduce heat transmission and also to prevent the material from slipping away from under your fingers. Keep the abrasive ON THE MOVE. If you just press the abrasive stationary against the revolving wood it will quickly clog up with dust. The dust is trapped between the abrasive and the wood surface, halting the cutting action and causing unnecessary friction. Keeping the abrasive moving helps to make the cut more even, minimising the formation of sanding rings. When sanding inside bowls or on large areas, switch pressure from finger to finger as if you were trying to play the piano. This gives sanding dust a chance to escape. When using strips to sand spindle work, use a sawing motion, pulling the strip back and forth, again to release the dust as much as possible. Do not let the edge of the abrasive saw into the wood and mar your beads in spindle work Take care not to destroy the crisp appearance of the design by rounding over the details. You can avoid this by wrapping the abrasive around small pieces of card to help get into the awkward parts and clean up decorative turned mouldings. Small or delicate turned pieces generally require finer grades of abrasive than large pieces. Do not overheat the surface of the wood by over enthusiastic sanding. The heat can dry out the surface of the wood causing fine "heat cracks" If you think the surface is getting too hot, use a plant mister spray to damp it a bit and cool it. If you are getting problems with clogging or heat cracks try Jayflex'S' which has a lubricating anti-clog coating. Have a brush handy and use it frequently to sweep the dust off the abrasive. Otherwise a build up of dust will reduce cutting performance and friction will cause heat cracks. Sand thoroughly going through the grades to at least as fine as 320. Even this grit will give "turning rings" caused by the lathe rotation not being in line with the grain. To get rid of turning rings, stop the lathe and hand-rub, in line with the grain. Your few seconds of elbow grease will be amply repaid. If that is not good enough you can get almost a polished surface by burnishing with 1500 grit WEBRAX. Many expert and professional turners use much finer grit silicon carbide products. You will always get the best result by stopping the lathe and hand-sanding with the grain. This will get rid of any turning rings and let you concentrate on any "sore patches" (to quote Frank Pain)WET SANDING Some woodturners like to sand wet in a effort to get a better finish. It is messy, but has the advantage that it produces a slurry rather than harmful dry dust. If you are sensitive to dust or you are using timbers which produce irritant dust (eg Iroko) wet-sanding could be a very useful technique. The surface of the wood is kept wet all the time. This swells the surface wood fibres so they stand up - to be cut off rather more cleanly than they would be if they were sanded dry.
SANDING WITH OIL Some woodturners oil the wood liberally with Danish oil before sanding. The resulting messy slurry fills the grain as it sands as it polishes! (or at least that is the general idea) You might like to try it sometime with Jayflex.
REVERSING THE LATHE With some fluffy timbers such as poor grade mahogany it is easy to end up with the wood fibres laid over all in one direction. Wood in this condition is very resistant to sanding but the problem can be solved if you can reverse the rotation periodically and sand the other way.
Power sanding This seems like cheating to woodturners of the old school. When I used to use this method (many years ago) I kept it quiet in case others would think I wasn't a proper woodturner! I used to make my own soft faced arbors from rubber carpet underlay attached to the power drill rubber sanding disc. Power sanding is very useful to professional bowl turners trying to maximise production. It is particularly effective for grinding spalted wood to shape when cutting tools fail to achieve a clean cut surface on soft areas. Power sanding uses a sanding disc attached to a rubber arbor. The arbor is held in a flexible drive or power drill and used freehand while the workpiece rotates on the lathe. The rotating disc must be angled in such a way as to "trail" the edge of the abrasive or it may catch and tear. The discs fix onto the arbor with Velcro. Velcro backed discs are available with cloth or paper backing. The advantage is that the abrasive does not clog up because it is on the move - rotating at high speed. The sanding dust is not trapped between the abrasive and the wood, as it is when the abrasive is hand held. The cutting action is very quick and you will soon generate dense clouds of fine dust as the wood is ground into shape. Because of the extra dust it is absolutely essential to wear a respirator and/or use an efficient dust extractor. One big problem with the Velcro facing on the arbor is that it can soften with heat and lose its grip. This problem is overcome by a superior system invented by Len Piers. His "Grippa Discs" are all foam backed. The foam stops the heat getting through to the velcro and melting the little hooks. This system uses very durable cloth backed abrasive which lasts so long that the running costs are no greater than plain (non foam) disc systems. Also the foam is replaced every time a disc is replaced, so foam breakup on soft arbors is no longer a problem.
Which is the best polish?
There are many different kinds of polish to choose from. Every woodturner has his or her own favourite but of course the polish must be fit for purpose.- If the product is to be washed or used in a kitchen or bathroom, it should be waterproof, and this limits the choice.
- If used with food it must be non toxic and washable.
- If it is a toy it would be wise to employ a polish for which a toy safety certificate is available.
- If it goes outside, the finish must be resistant to the degrading effect of ultra violet light from the sun which can destroy most transparent finishes. It must also be waterproof.
- If it is just an ornament then there is more choice and the finish to use depends on taste. The finish can be made thick and glossy or the layer can be barely perceptible, looking just like bare wood.
Wax Finishes
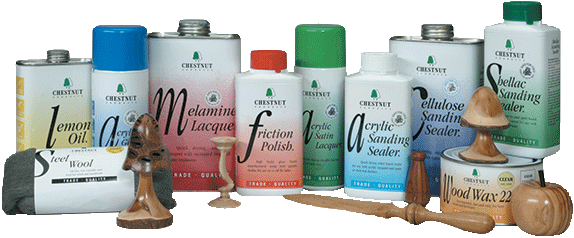
Wax finishes are not washable or particularly durable but are ideal for decorative projects which will not get a lot of handling. Soft "paste wax" such as Briwax, Chestnut Woodwax 22, and similar products come out of a tin in the form of a soft paste like boot polish. They are quick and easy to use and they can be used on bare wood or on top of any sealer or grain filler.
Soft wax can be coloured with Chestnut Spirit Stain. Just mix the colour in with some wax in an old jam jar. You can warm the wax to make it softer for this process but be very careful and do not use a naked flame as the vapour is highly inflammable. To melt the wax put the container in hot water. A little red pigment in the wax will "warm" the grain when finishing some brownish colour woods.
Wax is compatible with just about anything so can be used on top of an unknown finish (an old table for example). However nothing will stick on top of wax except more wax, so once wax is applied, you are committed.
Wax can be applied by hand so you can use it on articles after they have been removed from the lathe to improve the shine.
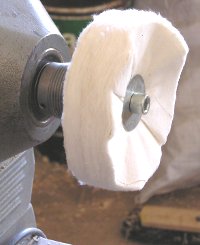
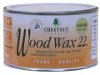
To save elbow grease you can use a calico or cotton polishing mop, mounted on the lathe or grinder, to burnish the wax. You can put the wax on the wood first and burnish it up, or you can apply wax, a little at a time, to the mop. To fit mops to your lathe you can get a morse taper fitting but I find it more secure to use a screw-on arbor like the one shown. Then there is no possibility of it coming loose and it is very easy to change mops (unscrew by hand). The photo shows two mops side by side on the arbor which in this case is a slightly modified Masterchuck thread adaptor (contact me for more details).
You can get stitched or unstitched mops. The stitched ones are more rigid and take more pressure. The wax in stick form can be applied direct to the mop and some turners use wax sticks containing fine abrasive. This refines the finish on the wood.
Using paste wax
For coarse grain wood seal first with sanding sealer and then rub down when the sealer is hard, with 1500 grit webrax.
Apply wax to stationary or revolving wood using kitchen paper, safety cloth or a soft cotton cloth. For an exceptionally fine finish apply the wax with 1500 grit webrax instead of the cloth.
Wait 15 minutes or so, depending on how warm and dry the workshop is, until some of the solvent evaporates and the wax is harder. Burnish to a shine with light pressure. Always use a cotton cloth for the final shine if you can.
Hard wax sticks
These are generally made from a blend of waxes formulated to give a hard durable finish. They come in solid form and are melted onto the wood with friction.
Neat Carnauba Wax is the best. It is the most difficult to apply because of its high melting point but gives the glossiest, most durable, wax finish of all. It is hard and virtually waterproof and is suitable for lightpulls in bathrooms etc. Carnauba is a natural vegetable wax made from palm leaves in Brazil. Carnauba gives best results on hard, fine grain wood. Some soft woods such as walnut, do not respond well to a carnauba finish.
Blended wax sticks are easier to use than carnauba because they are softer and easier to melt. They are also cheaper especially if synthetic waxes are used in the mixture.
Beeswax is OK but rather soft and sticky. It is better if it is melted and a proportion of carnauba mixed in. Try 50/50 and pour the melted mixture into aluminium foil moulds to make your own wax sticks. A good shape is a triangular section which enables you to get the wax into awkward corners on the turned workpiece. You should not get the wax too hot when you melt it or it will impair the characteristics of the wax. The stick should be allowed to solidify very slowly in the mould or it will crack into splinters. The result will be well worth the effort as you will get a lovely polish better than anything you can buy and made from entirely natural ingredients. You might come accross a recipe for soft wax using carnauba, beeswax and turpentine but beware - turpentine is now known as carcinogenic and it is highly inflammable. Best to stick to the "hard stuff". (two awful puns there- sorry)
Using hard wax sticks
Sealer is optional but many woodturners use a coat of Cellulose or Shellac Sanding Sealer before applying any wax. This is an advantage with coarse woods such as Elm. Try it with or without sealer and see which works best for you.
To apply the wax have the lathe running at the same speed as you used when you did the turning. Use the wax like a wax crayon to smear on a thin coating, as evenly as possible, over the whole surface of the wood. Apply sparingly - you can always put more on later. Rub using a soft cloth, preferably cotton material, so that the friction generated melts the wax. Melt the wax evenly into the grain. Use only a small area of cloth and press quite hard. Some turners put a knot in the cloth and use that. As the wax melts, the surface of the wood will initially go glossy, but then you will see the wood darken and the surface go dull as the molten wax soaks into the grain. If you cannot get the wax to melt easily, increase the speed of the lathe and/or press harder. Try to achieve an even darkening of the wood surface and melt in all the wax. Apply more wax if necessary on "bare" patches. When you have an even, but dull, sealing coat of wax you can use the stick and apply another light coat. This time use a clean bit of cloth and use light pressure with a larger area of cloth in contact with the wood. You should be able to bring up a respectable shine. The object is to just cover the wood with an even, glossy film of wax. If you put too much wax on, you will get rings. If you put too little on, you will get dull patches. You can burnish into the awkward corners and mouldings by using pieces of cardboard or wood covered with a layer of cloth.
The harder the wax, the glossier the finish. Some proprietary wax sticks are relatively soft (this makes them very easy to melt) but the finish can go dull with handling. You can brighten up the shine and make the finish more durable by using a coat of paste wax (such as Briwax) on top. If you use coloured paste wax such as "Dark Mahogany" you can warm the appearance of cold coloured wood such as teak or walnut.
Using neat carnauba wax
As above, but higher speed and pressure is needed to melt the wax. Neat carnauba wax is hard enough to be burnished with soft wood or card. Be careful with soft woods as the wax may me hard enough to score the surface. If you have real trouble getting an even gloss you can try rubbing it down a bit with 1500 grit webrax and then shining up with a top coat of paste wax or beeswax.
Cellulose Sealers and Lacquers
Cellulose polishes are synthetic products using cellulose thinners as a solvent. You are supposed to use a cellulose system comprising a base coat and a top coat.Cellulose Sanding Sealer provides a quick build-up of basecoat which fills the grain to some extent. It has an additive which makes it easy to sand down to a super smooth surface ready for the top coat. It stops the top coat from sinking in, and speeds up the entire polishing process. Many turners prefer a cellulose sanding sealer to others because it is quick drying, economical and effective. It comes in many different types and qualities. You usually have to pay more for the best grades and often it is well worth it. Some cheap grades of sealer (made for the coffin trade!) do not have so much "build" as the better grades and will give disappointing results. Some woodturners thin down their sealer with up to 50% cellulose thinners to aid penetration. The manufacturers do not recommend this but there is no harm in trying it.
Melamine top coat
After the sealer has dried and been "de-nibbed" (rubbed down with fine abrasive) it is time for the topcoat. Melamine lacquer is cellulose lacquer with a melamine additive and is designed to be applied over the top of cellulose sanding sealer "basecoat" as part of a "system". The active ingredient is a pre-catalysed melamine resin. It gives a hard glossy durable and water resistant finish. Unlike the sealer which is fully hard once the solvents have evaporated, the melamine needs to cure (harden) after the solvent has gone. The curing will take a little time and will only work at reasonably high temperatures so make sure your workshop is not damp and freezing cold! Melamine is intended to be used over a sealer but can be used successfully on its own on fine grain wood. Burnishing cream can be used to enhance the shine preferably after the finish is fully hard.
Many turners use wax as the topcoat on cellulose sanding sealer. Alternative top coats are acrylic spray or even friction polish.
Shellac and Friction Polish
Shellac is used for French polishing and is a kind of natural plastic produced by the Lac insect. It gives a high gloss. The solvent used is alcohol (meths is OK). Granules of hard shellac are dissolved in alcohol to produce a honey coloured liquid polish. Oil and other additives are used to produce "friction polish" The natural colour is dark brown but bleached or "pale" polish is used for the white grade of friction polish.Shellac Sanding Sealer. Shellac sealer takes longer to go hard than cellulose but it is more compatible with shellac topcoats. For example it gives better results with shellac friction polish. I find it gives a nicer looking result with wax polish than cellulose sealers.
Friction Polish is a shellac based polish with oils, possibly waxes, and powders which prevent the "rubber" from sticking. It should be applied over shellac sanding sealer, or on bare wood if the grain is fine. Apply using a cotton wool "rubber", preferably covered with soft cotton cloth. The wood should rotate at relatively low speed. The finish should be worked to an even, high gloss. A certain amount of practice and skill is needed for good results. It is easier to apply in a warm and dry workshop.
Friction polish is applied on the lathe, producing a high gloss finish in seconds in skilled hands and is impressive to watch at demonstrations. However it is not noted for it's durability generally and is attacked by alcohol. It is good for small decorative objects.
Oil Finishes
Finishing oil is easy to apply and gives a durable extremely attractive finish which will continue to look good for many years. It is ideal for salad bowls. If some of the finish is worn away or washed away in use then more oil can be applied on top.Oils used for polishing should be "drying oils" which slowly oxidise in the air and eventually go solid. Examples of natural drying oils are tung oil, walnut oil, linseed oil and corn oil. Once the oil has oxidised it cannot be dissolved by ordinary solvents. Oils should be well sealed in storage and kept with the smallest possible amount of air in the tin. Otherwise the shelf life will be rather short. Some oils go harder than others and some only go "gummy" such as raw linseed. If the oil does not go hard the finish will not be durable and will give a dull sticky finish which attracts dirt. Proprietary finishing oils, such as Danish oil, will dry much harder and will give an attractive durable finish. They can contain varnish and solvents as well as oil and they also contain chemicals which act as catalysts to accelerate the drying process. If you want to avoid these chemicals then use pure Tung oil which also happens to give the most durable and water proof finish. The Danish Oils which we stock are safe for use on food utensils but the solvents in them (added to aid penetration and ease of application) must be allowed to evaporate before the finish becomes safe - allow at least 24 hours before use. Oil finishes tend to darken the wood a shade. Tung oil goes darker progressively with age and after some years, perhaps decades, depending on conditions, it will go almost black. Oil does not give a shiny or glossy finish (Danish oil and finishing oil can be burnished to a gloss) and many turners put wax on top to brighten up the finish.
Using Danish oil or finishing oil
(a) Sand to a good finish
(b) Stop the lathe and apply Oil with a soft cloth. Work well in to the grain paying special attention to the end grain where it sinks in most readily. Wait 10 minutes and repeat. Burnish the oil into the grain on the lathe using the original cloth which is slightly moist with oil. Lathe friction will accelerate the drying of the oil.
(c) Leave 12 hours, or longer if possible, for the oil to dry. Danish oil will dry in 4 hours but it will not be really hard.
(d) Burnish on the lathe with a soft cloth. Apply a coat of Briwax or similar. Polish to a shine on the lathe. Always use a cotton cloth if possible. If you can, give it another coat of wax after a few days when the oil has gone rock hard. This will bring out a lovely transparency and lustre. If you have a chuck you can use it to re-mount articles which have been off the lathe which need another coat of polish.
If you have time, oil finishes can be improved by putting on more coats at 12 hour intervals (or longer) until you have the depth of shine that you require. You can use Tung oil instead of Danish for better water resistance but it will take longer to dry and it will not be as shiny.
After a few days, Danish oil goes very hard and can be burnished with a cloth to a good gloss.
You must never put oil (or anything) on top of wax. Technically, putting wax on top of oil is incorrect (ask the polish manufacturers) but it works fine for me.
Food safe oil.
Chestnut food safe oil is a clear odourless oil which can be wiped on to bare wood with a soft cloth. Leave to dry a bit then apply another coat. Burnish off any surplus after a few minutes. The result is a pleasant soft satin sheen finish which is water resistant. It is ideal for kitchen utensils. If the wood needs scrubbing to clean it then more oil can be applied to make it look nice. If you give, for example, a chopping board or salad bowl as a gift you could also give a little bottle of oil for the user to apply to touch up the finish.
Comparison of Oil and Wax finishing systems
You will see from reading the above that wax is very quick and easy whereas the oil finish takes a day or two to complete. In my opinion the oil gives a more attractive finish which improves with time. It seems that one can see deeper into the wood with an oil finish. All the most admired bowls in our collection in the shop have been finished with Danish Oil and Wax. You should try both oil and wax for yourself and make up your own mind.Water Based Finishes - Acrylics
These finishes use water as a solvent to avoid the unpleasant and harmful fumes from organic solvent based conventional finishes. Most hydrocarbon solvents will be eventually phased out because of health and safety issues in industry so one day you will have to learn to use the water base finishes. Acrylic sealers and topcoats are available and are easy to use. The result is an attractive durable polish.Using acrylics.
Sand the wood well. Switch off and protect the lathe bed with newspaper. Apply acrylic sealer with a soft brush, brushing slowly and carefully, avoiding a scrubbing action or bubbles will form. Foam brushes are available which minimise this problem. Wash the brush out in water quickly and keep in water until the job is finished. Coats will dry in about twenty minutes but if you can, leave to harden for a couple of hours before rubbing down for the next coat. Rub down with webrax. Two coats should be sufficient. If the work is still on the lathe try burnishing with 1500 grit webrax. You may well be so pleased with the finish you get that you will not be inclined to add anything more on top. If you want a real shine you can burnish with Chestnut burnishing paste or apply soft wax polish for the final touch.
However acrylic sanding sealer is really designed to have a hard wearing acrylic top coat applied as the final finish. Chestnut acrylic gloss lacquer is ideal and is available in aerosol spray canisters for easy application. You can spray with the lathe operating at slowest speed. Take care to apply lightly and evenly. If you are spraying a bowl do not dwell with the spray aimed at the centre or you will quickly get too much build-up there.
Chestnut acrylic sealer and gloss are toy-safe products.
Synthetics
If you need a waterproof finish then you will have to use a waterproof synthetic lacquer. Rustins Plastic Coating is ideal because you can thin it down to give the exact effect you want. Unthinned, it will give a gloss, heat-resistant, washable coating. It is water-clear and will not go yellow. This clarity makes it ideal for use on light coloured wood. You can thin it to give a non-glossy finish or thin it right down to give an imperceptible but protective seal. Rustins Plastic Coating is safe for food utensils. It is a two-can finish which will keep for about 24 hours once mixed - provided it is sealed in a jar. It is available in black and white or you can add Chestnut spirit stain to get any colour you like.Outdoor finishes
Technology has not yet devised the perfect outdoor clear varnish as any boat owner will tell you. Work which has to survive outside should be protected by the most durable outdoor varnish you can buy. Even so they may have to be re-varnished every couple of years or so.Stains
To use staining successfully on turnery, your standard of finish must be immaculate. Any turning rings or tool marks will be emphasised by the stain which will darken any damaged or "rough grain" areas. Just about every turned article shows both end and side grain and you will find that stains take much more readily to the end grain areas making them much darker. Stains can be oil, spirit or water based. Whatever type of stain you use you must make sure that it is compatible with the sealer or varnish you will eventually apply over the top. The tendency is for the varnish to dissolve the colour and spread it into unwanted areas. You should experiment first on scrap material to check on compatibility. Water-based wood stains will not be affected by the majority of varnishes but they will 'raise the grain'. This means that they will swell the wood fibres and cause a rough surface. The way to avoid this is to deliberately raise the grain, before you apply any stain, by wiping with warm water. Wait for it to dry and then sand with new, sharp, 400 grit silicon carbide paper to remove any raised wood fibres. You might have to do this twice to ensure that subsequent application of water colours does not raise the grain further.Spirit (alcohol) based dyes give lovely colours and tend not to raise the grain. They can be obtained in concentrated form (see our price list) and can be diluted with methylated spirit to give the required density of colour.
Mixable Stains
These are colours with a methanol base which can be mixed in with most varnishes and cellulose lacquers. They even mix with Danish Oil. Their big advantage is that you can get exactly the colour and shade that you want by mixing in the right amount of primary colours - RED, YELLOW and BLUE. Black and orange are also available to get darker stains. If you use a coloured varnish or lacquer the result will be a coloured film on top of the wood rather than a change of colour of the wood itself. This tends to disguise imperfections in the turned finish rather than showing them up as in the case of ordinary stains.
SAFETY PRECAUTIONS
- Read the instructions and safety warnings on the containers.
- Use solvent based finishes only in well ventilated areas and avoid skin contact as much as possible.
- NO SMOKING! Always be on guard against any fire risks. Do you have a suitable fire extinguisher available in case of fire?
- FOOD SAFETY. Most finishes are non toxic and many are labelled "safe for toys". It so happens that it is cheaper for a polish manufacturer to get a product tested and approved for toy safety than it is for food safety but if it is safe for babies it should be safe for us!
You can buy polish in our online shop Online shop