Woodturners - make your own superb crush grind peppergrinders! |
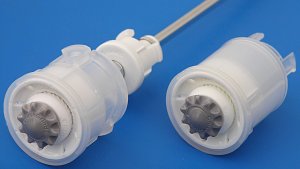 |
CrushGrind
Ceramic Peppermill mechanisms
- Grinds pepper, salt or herbs
- Controllable, even, productive grind with less effort
- Very hard wearing - expect 25 years of constant use
- Coarse or fine grind adjusted by knob at bottom so no knob shows
at the top.
- As no knob shows at the top, woodturners can produce elegant clean
designs
- Shaft can be easily cut down to the size you want (no thread needed
at the top of the shaft)
- Push - click assembly
|
| |
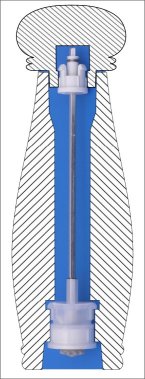 |
Suggested design.
The plastic hooks click into undercuts turned into the top and bottom
components.
Splines moulded onto the barrels prevent rotation but glue is required
if the wood is very hard.
1,1/2 inch hole is needed for the grinder mechanism at bottom and a
7/8 inch hole is needed at the top.
To fill with pepper just pull the spring loaded top off the shaft,
fill, and replace. |
|
The shaftless design is
similar but it is driven by the set of hooks at the top which fit into
the top wooden part of the mill. |
|
 |
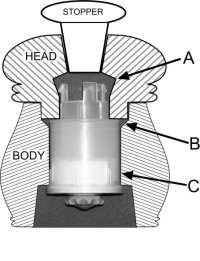
MAKING A CRUSHGRIND PEPPERMILL (SHAFTLESS DESIGN)
- Use a chuck to turn a cylinder of wood for the BODY about 65mm diameter and 80mm long.
- Drill or hollow the 38mm hole for the lower part of the mechanism. It should be a tight fit so the splines at (C) press into the wood and prevent rotation.
- Open up the hole to bigger than 42mm and deeper than 16mm for the base of the mechanism so the grey knob will be clear of the table top.
- Open up the hole a little at (B) with the corner of a small scraper so the outer edge of the rotating part of the mechanism does not rub and bind in the hole in use.
- Polish, finish and part off the body at a suitable length about 63mm. Finish the cut surface by hand or reverse onto a jam fit chuck tenon.
- Turn the HEAD of the mill in a similar way. The hole for the mechanism is 25mm. Again the splines should bite into the wood to prevent it slipping round in use. Open up the hole a little at (A) with the corner of a small scraper to allow the three little plastic hooks to retain the mechanism in the head of the mill. You may need to glue it in to be safe but test the finished mill first. To finish the head of the mill reverse it onto a jam fit chuck made out scrap wood, cut the taper to receive the stopper. Finish and polish the head.
- The stopper is made, perhaps from contrasting wood, from a small cylinder held in a chuck and parted off.
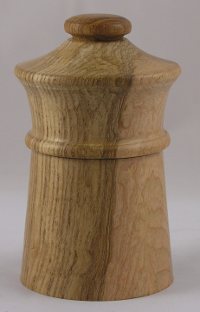
- The outer shape is up to you. The diagram is only a suggestion. The stopper could be parallel instead of tapered and held in with a rubber O ring. There are lots of possibilities. The finished mill shown is ash with unusual colouration. It is not for sale - we sell mechanisms only - sorry.
Notes
It is vital that the wood is dry. Shrinkage can cause the mechanism to bind. If you use glue, use the minimum amount needed to retain the grinder and if possible use soft glue such as silicone. If you suspect that your material is a bit damp then turn and hollow the components roughly to shape leaving the chuck spigot on. Drill the holes a little smaller than finished size. Then keep the material in a dry room for a week or two before replacing in the chuck to finish off. Open up the holes to size with the corner of a scraper (not a drill) to ensure concentricity. As the components are tubular you can even start with partly seasoned wood such as branchwood (try yew or laburnum) so long as you are prepared to have a few failures. |
|
Sitemap - a list of site contents with links. |
| |
 |
This
page updated September 2011 - contact us for latest prices and offers |

